Pages

Thursday, April 29, 2010

Toasted Joes

I saw a recipe for Toasted Joes years and years ago and decided to try my hand recently at making my own in a veganized version.  I couldn't remember the original recipe, so the seasonings are my own touch.   I have no idea why they're called Toasted Joes, but I also have another dish called Joe's Special that my father and I used to make on long bicycle trips. I'll post that one someday, too. Could it be the same Joe? I have no idea. And, let's not forget the classic Sloppy Joes. So many Joes, so little time. But, without further wait, let's explore the Toasted version of Mr. Joe. These were pretty good, and I'm definitely adding them into my menu rotation. They could also double as a lunch on a Saturday afternoon, I think.


Toasted Joes

Ingredients:

6 English muffins, separated into their halves
1 pkg. of vegan sour cream (we used the Tofutti brand)
1 tsp. garlic powder
1/2 tsp. salt
1/4 tsp. pepper
4 cups fresh spinach leaves
2 cups mushrooms, halved and sliced

Directions:

Toast the muffins, and place on a large platter or cookie sheet. In a medium pot add the rest of the ingredients. Cook over medium heat, until the spinach wilts and the mushrooms are tender. You may need to turn the heat down to medium low, if the sour cream is boiling too high. With a slotted spoon, spoon the topping over the muffin halves. You will have plenty of sauce leftover, which is surprisingly delicious, to drizzle over the top. If you eat it right away, it can be finger food; however, if you wait a few minutes, I recommend fork and knife. If you choose, you can bake them at 350 degrees for 15 minutes to get them even toastier. Both ways taste very good. Feeds five hungry vegans.

Monday, April 26, 2010

Breakfast Sausage Sandwiches

This is my version of the infamous animal-ridden fast-food breakfast sandwich. I don't have a strong need to veganize everything animal-based, but this was something that I ate in early childhood. My father would take me to this particular fast-food restaurant occasionally on weekends for breakfast, and this sandwich is what I inevitably ordered. So, it's good food memories co-mixed with sentimentality, and that's probably why I decided about a year ago to remake it for my family. I'm not claiming huge health benefits from my version, just an ethically better substitute. And, of course, mine tastes better!

This is what the completed sandwich looks like.

And, this is the bird's eye view before its top is on.

Breakfast Sausage Sandwiches

Ingredients:

6 English muffins cut in half, totalling 12 halves (we used regular and sourdough)
1 Tbs. and 1 tsp. canola oil, divided
1 pkg. of Gimme Lean Sausage, sliced into 12 rounds
1 pkg. of extra-firm tofu, water packed, drained, and cut into 12 small rectangles
1 pkg. of vegan cheese, sliced thinly in 12 slices (we used Vegan Gourmet, Monterey Jack)
Your favorite vegan mayonnaise (we use Veganaise and Nayonaise)

Directions:

Place oven rack second from top, and turn on the top broiler. Toast the English muffins, and lightly spread with the vegan mayonnaise. Set aside. In a skillet, heat 1 tsp. of the oil over medium heat, and add the sausage rounds. Cook until browned on both sides, a total of about five minutes or so. In a griddle, heat the rest of the oil over medium heat, and carefully place the tofu slices - they might splatter due to their water content. Cook until brown on both sides, a total of about ten or fifteen minutes. I juggle all of this food at the same time, so that no dish is sitting out in the cold for too long. On a cookie sheet, line six of the muffin halves, vegan mayonnaise side up. Put a tofu slice on top of each muffin and a sausage round on top of each tofu. Slightly angle the cheese on top of the sausage, so that it makes a slight "X" with the tofu. That way you get the most food for your bite! Broil until the cheese melts, about two or three minutes. Watch so the muffins don't burn. Take out of the oven and top with the remaining muffin halves. Open wide and bite. Ah, good memories... Very filling. Feeds five hungry vegans.

Friday, April 23, 2010

Big Salads with Soy Strips

I want to start off by saying "Thank You" to everyone who commented and wished us the best on my last post about our sweet dog, Earl. Tomorrow it will be one week, and our home and backyard just hasn't been the same. I was really moved by how many people took the time to send their thoughts our way - the online world can be very wonderful.

Well, it's time, I think, to post a new dish. Every now and then we love to have big individual salads for dinner. It's our only course, and so the salads are meals in themselves. They are chock full of wonderful, crisp, crunchy veggies. I have themes, of course, for them, and this one is with soy strips. I found a brand I really like, and in fact, I use them in several recipes. So, you can obviously change up the veggies any way you like. Below, is just our latest version, and it was delicious!


Big Salads with Soy Strips
Ingredients:

2 tsp. canola oil
2 pkgs. of Morning Star Farms Meal Starters Chik'n Strips
Your favorite veggies on hand. We had:
1 big head of Green Leaf lettuce, chopped
Red cabbage, chopped
Mushrooms, halved and sliced
Marinated red bell peppers, halved and sliced
Carrots, grated
Vegan cheese, finely grated (we used Vegan Gourmet, cheddar style)
Celery, chopped
Green onions, sliced
Your favorite salad dressing (one of mine is Annie's Naturals Shitake & Sesame Vinaigrette)

Directions:

Heat oil over medium heat in skillet. Add the strips and cook until browned, about five minutes or so. Once the strips have browned, let them cool a few minutes. Prepare the veggies while waiting and while the strips cool down. Chop the strips into small, bite-sized chunks. On individual plates, serve up the lettuce and the veggies and strips into whatever quantities everyone wants. Add a couple of tablespoons of salad dressing, and dig in! Very easy. Feeds five hungry vegans.

Tuesday, April 20, 2010

Dedicated to Earl

This post is simply dedicated to our wonderful pup, Earl, who passed away on Saturday, surrounded by his human family who loved him so much. I have posted pictures of our sweet dog on two other occasions, and I can't say enough what a perfect dog he was for our family. He died of whip worms, possibly ingesting them while on a walk. They weakened him quickly, and even medication could not defeat his horrible struggle with them. We had him for eleven years, when my oldest was just 18 months old, and for my other two, they have known no childhood without their Earlie-boy. He was a pound puppy that was destined to be in our family. He is known for being the most gentle dog on the planet, having spit eyebrows, super-slobbery kisses, being afraid of anything hand-held, including cameras, eating our growing garden, and loving walks and attention. I have many pictures of him, but most of them were pre-digital days, so these just start last year. They included him as a puppy, wearing any assortment of things that my children put on him, and just the general joy of life with Earl. Please enjoy my small selection of pictures below, honoring Earl, with rare online pics of my children who desperately wanted to be shown with their doggie. We love him and always will.

Earl on a walk


My oldest, SR 12 yrs. old, giving Earl a bath just two weeks ago when he was very healthy.


Earl is not appreciating his scrubdown.


Earl's bath provides entertainment for GR 10 yrs. old, who pulled up a seat, and JK 3 yrs. old.


Poor, wet Earl.


Who's giving whom a walk? Earl and GR.


SR trying to hold onto Earl for a picture, but it's with a scary camera!


Earl's head injury after a dog bit him on our walk in October. Again, notice the leash in order to hold him still for the camera!


Earl's turn for bobbing for apples with SR.


Duplicate pic as above - this one was supposed to be showing Earl watching GR bob for apples. But, I loaded the wrong one, and Blogger is too difficult to fix photos, but it was a cutie!


Our Sweet Earl

Saturday, April 17, 2010

Creamy White and Green Soup

Well, first off, there is no cream in this soup. However, the beans are so creamy and add such a creamy feel to it, that it deserves this name. This was a soup that I made out of stuff I currently had in my fridge and pantry and had no prior intention of posting the recipe, but it came out so tasty, that I thought it deserved to be passed along. It's warm and comforting, simple and healthy. I hope you like it, too.


Creamy White and Green Soup

Ingredients:

1 pound of dried great white northern beans
Water
1 turnip, peeled and diced small
2 cups of mushrooms, sliced
1 large stalk of broccoli, trimmed and diced
1 bunch of collard greens, removed from stems and chopped small
2 cans of vegetable broth
2 tsp. of salt
1/2 tsp. of pepper
1 Tbs. garlic powder

Directions:

Sort the beans and put in a large pot with water to cover them about two inches. Bring to a boil, and continue boiling for five minutes. Drain and rinse well. Put back in pot with same amount of water, and cook over medium heat for an hour. Reduce heat to medium low and continue to cook for another hour, adding water as necessary to keep it at about one inch above the beans. Add the remaining ingredients, and cook for another half-hour, until the turnip is tender. This is surprisingly tasty, and even all the children liked it! So, that's saying something. Feeds five hungry vegans.

Wednesday, April 14, 2010

Bean Tortilla Salad with Greens

I've been making variations of a tortilla salad for a long time, but usually I throw lettuce in at the end before serving. This time I started with greens since we have an abundance in our garden, and we get them delivered from a farm on a weekly basis (along with other produce). I must say it turned out great. I love greens, I mean really love them, so this adds more health to a meal that I normally would eat just for the Mexican flavor of it. Some of you may already know my passion for heat! This dish is very mild, though, but you can spice it up any way you like. Enjoy!


Bean Tortilla Salad with Greens

Ingredients:

1 Tbs. olive oil
3 big bunches of greens (I used green chard and two different kinds of kale), removed from stems and chopped coarsely
1 - 15 oz. can of small red beans, undrained
1 can of black olives, drained and sliced in thirds
2 tomatoes, diced
1 tsp. salt
1/4 tsp. pepper
1 Tbs. garlic powder
Corn tortilla chips

Directions:

In a large skillet, heat the oil over medium heat. (For those who are stumped on how to separate greens from their stems, excluding spinach, it's actually a very simple method. Hold each green stem-side up, then gently grab the leaves and pull down towards the top. This should remove the green leafy part from the stem. If the stem is very small, I just cook it up. Sometimes, if the green is stubbornly attached, just pulling it gently away from the stem at that part will be enough to release it the rest of the way.) Once the oil is heated, add the greens and stir quickly for two to five minutes, until they brighten up. Because of the large amount of greens, be sure you stir so the bottom leaves rotate with the top. Once they have wilted somewhat and brightened, add the rest of the ingredients, and cook until heated through, about two or three minutes more. The moisture from the canned bean liquid will help further wilt the greens and prevent burning. Take three big handfuls of chips and crunch them in your hands into various sizes of chunks, as you drop them in the skillet. Stir until all is mixed together, then serve. Feeds five hungry vegans.

Sunday, April 11, 2010

Baked Potato Skins

I haven't had baked potato skins for a very, very long time. So, I thought that I could probably come up with a yummy vegan version. These turned out great; everyone loved them. I hope you do, too.


Baked Potato Skins:

Ingredients:

5 russet potatoes
1 and 1/2 cups of your favorite vegan cheese, finely grated (we mixed Vegan Gourmet's cheddar and Monterey Jack styles)
2 tomatoes, diced small
3 green onions, sliced
1 can black olives, drained and sliced into thirds
Your favorite salsa

Directions:

Preheat the oven to 400 degrees. Prick each potato several times with a fork, and wrap in aluminum foil. Place directly on oven grill and bake for one hour or until fork-tender. Remove, unwrap and let cool for about fifteen minutes. Turn on top oven broiler. Cut each potato in half, and scoop out most of the potato flesh, leaving a thin layer behind. Reserve the removed potato flesh for another meal, like mashed potatoes. Lay all the potato halves on a large cookie sheet, cut side up. Sprinkle each half with cheese and all the toppings, except the salsa. Place the cookie sheet under the broiler for about two or three minutes until the cheese is melted. Be careful not to burn the potato skins. Remove from oven and top with salsa. (My photo is before I slathered on the salsa.) I liked my other toppings baked into the cheese, but you can hold off topping the potatoes with them until the skins and cheese are broiled, if you wish. Keeps well for the next day's lunch. Delicious! Feeds five hungry vegans.

Thursday, April 8, 2010

The Breakfast Stack

Years ago, when I was vegetarian, my husband used to make a belt-busting breakfast. It was a pile stacked high with all kinds of fattening goodness. It started off with a layer of tater tots, then a clump of cottage cheese, followed by cheddar cheese grated on top, with a fried egg on top of that, then salsa or hot sauce would crown everything! We haven't had it in years, and recently I thought I'd try my hand at recreating it vegan-style. Hopefully, it's come out a tad healthier in the process. So, introducing...The Breakfast Stack!


The Breakfast Stack

Ingredients:

1 large bag of tater tots
1 package of water packed extra-firm tofu, drained
1 tsp. canola oil
1 package of vegan cheese, finely grated (we used Vegan Gourmet mozzarella)
Your favorite salsa
1 package of Tofutti Better than Sour Cream

Directions:

Bake the tater tots according to package directions. While they are baking, slice the tofu on the smaller rectangle side into at least ten pieces. Heat the oil on a skillet and fry the tofu until browned on both sides, about ten or so minutes. When the tater tots are done, remove from oven and set aside. Make sure your top oven rack is in the second slot from the top, and turn on the top broiler. Put your tofu slices on a cookie sheet and top with the cheese. Broil until the cheese is melted, about three minutes. Create your stack by starting with a scoop of tater tots, followed by the tofu and cheese, then the salsa and sour cream. My husband wants me to confess that once the picture was taken, I slathered on even more salsa, which I love! Very tasty and kid friendly. Feeds five hungry vegans.

Monday, April 5, 2010

Pecan Raisin Tart

This is a beautiful tart that I think is so elegant looking and tasty. The crust always comes out great and is one of the best tasting ones I make. I made this for our Easter dessert. We had a very simple dinner since our potluck with the extended family was cancelled for unforeseen reasons. So, when I had only planned one dish to share at dinner and this dessert, I was suddenly faced with planning a whole holiday meal. Needless to say, I ended up keeping it very simple.

Here is our menu:

Spring rolls with dipping sauce
Steamed rainbow carrots (that my younger daughter picked out)
Kale with sausage (a very easy recipe that I will share in a later post)

For dessert:

Pecan Raisin Tart

Without further ado, here are the photos and the recipe. This will take an afternoon or morning to make, so don't rush it, and enjoy yourself and the fruits of your labor afterwards!
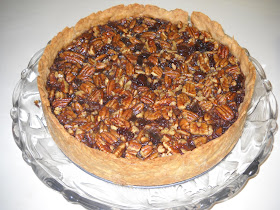

Pecan Raisin Tart


Wedge of Pecan Raisin Tart


Easter Dinner 2010


Pecan Raisin Tart
Ingredients:

Crust:

1 and 2/3 cups of flour
1/8 tsp. salt
2 and 1/2 Tbs. of vegan sugar
One stick and 3 Tbs. of vegan margarine, chilled and diced
1 Tbs. Ener-G Egg Replacer
5 Tbs. cold water

Filling:

1 and 1/4 cups of brown sugar, packed
2 sticks of vegan margarine
1 cup of homemade or your favorite store-bought maple syrup
A pinch of salt
3 Tbs. Ener-G Egg Replacer
12 Tbs. water
1 tsp. vanilla extract
1 cup raisins
4 and 1/2 cups pecans, coarsely chopped

Directions:

I make most of my crusts in my food processor. However, I also have a pastry cutter that I sometimes use. If you do not have a food processor, feel free to use your pastry cutter, or even a butter knife or fork for the following directions. With your pastry blade inserted in the food processor, mix the flour salt and sugar together. Add the diced margarine and process until it looks like fine crumbs. You made need to stop the machine occasionally and scrape the ingredients from the side of the machine before continuing. Whisk together well the Egg Replacer and cold water. Remove the lid from the feed tube and add the whisked ingredients with the machine running. Wait about a minute to see if it turns into a ball, or pretty close to a ball. This is successful almost every time for me. If it is still fairly dry, add a teaspoon of water at a time to get it into a ball. Be sure to not get it wet or sticky. Most of the time you will not need this additional water. Remove the dough onto waxed paper and keep it in a ball. Wrap the waxed paper around it and chill for fifteen minutes. Preheat the oven to 400 degrees. Remove the dough from the refrigerator, and on a lightly floured surface roll out the dough to a circle about thirteen inches in diameter. I usually sprinkle a little flour on top of the dough before rolling, so the rolling pin won't stick. In a ten-inch spring form cake pan, carefully lay the rolled out dough. Mine almost always cracks, so don't worry if yours does. Simply press the dough together gently with your fingers. If there are uneven sides to the dough, take the extras and press it in the needed spaces. You will want your dough on the bottom and all around the side of the pan. Prick the bottom and side of your tart crust all over with a fork. Chill for ten more minutes. Remove from the refrigerator and line the crust with waxed paper. Pour one pound of dried beans on the waxed paper, being sure that the whole bottom of the crust has weight on it. Bake for fifteen minutes. Remove the pan from the oven and lower the heat to 350 degrees. Carefully lift two sides of the waxed paper, so it's slightly folded in the center. Use this fold to pour the beans into a spare bowl, and toss the waxed paper. Continue baking the tart for seven more minutes. Remove the pan from the oven, and reduce the heat to 300 degrees. Let the crust cool while you make the tart filling. In a medium pot, put in the sugar, vegan margarine, syrup and salt. Bring to a boil. Once boiling, reduce heat to medium and cook for five minutes, stirring often. If it threatens to boil over, reduce heat slightly. Remove from heat. In a large bowl, whisk together the Egg Replacer and water. Add the vanilla extract and stir. Add the raisins and stir. And, finally, add the pecans and stir very well. When completely mixed, pour in the syrup mixture and stir thoroughly. Pour into the pie crust and bake for one hour. The filling will feel somewhat soft to the touch, but don't worry: it will firm up. Let completely cool on a wire rack. I suggest bringing to room temperature before serving, if you have to chill it. Feeds more than five hungry vegans.

Thursday, April 1, 2010

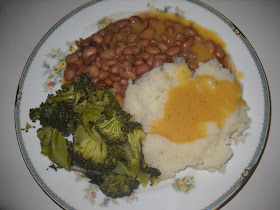
Pintos with Mashed Potatoes and Gravy

So, this dish is a little different because there's several things for which to include recipes. The reason is because I have a large list of menu ideas taped to the inside of my kitchen cupboard that I refer to constantly. These are dishes that I've created or modified, and instead of wondering what to make every night, I make a weekly menu from it, along with a new recipe or two. Well, this dish is one of our basics that we have frequently. My husband introduced me to dried beans; I had no idea they existed before him. And for years he put up with my canned beans. Not only that, but I would drain whatever liquid was in the pot before serving them to him. So, for two or three years he ate dry canned beans without complaint. Then one day, he asked in frustration, "Why do you drain the beans?" I was surprised and thought about it and said, "Because my mom did." That's when he took me under his Southern tutelage, showed me, to my astonishment, bags of beans and instructed me to not drain them. Instead, a natural gravy would form from the long, slow process of cooking the beans. The longer the better because then he doesn't have to bother to chew, which he finds overrated and unnecessary if the food is cooked properly. Have I mentioned he's high maintenance? There's so much I could tell! Anyhow, he says this natural bean gravy hits a spot in his tummy so sweetly that reminds him of his childhood where his family, with nine other siblings, ate beans every night of the week. So, now we have beans all the time, and I throw along mashed potatoes and gravy. The only other acceptable potato subsitution would be fried, and then he likes it cut a certain way, and then...oh well, you get the idea. After that, we add any steamed veggie we have handy. So, let me show you our easy, basic way to make our staple meal. Hope you like it!


Pintos with Mashed Potatoes and Gravy
Ingredients:

Beans:

1 pound of dried pinto beans
2 tsp. salt
1/2 tsp. pepper
1 Tbs. garlic powder
1 box of vegetable broth
Water to cover

Mashed Potatoes:

10 russet potatoes
1 stick of vegan margarine
1 cup of soy milk
1 tsp. salt
1/4 tsp. pepper
1 Tbs. garlic powder

Gravy:

1/4 cup vegan margarine
3 Tbs. flour
3 cups of vegetable broth
2 Tbs. soy sauce
2 Tbs. nutritional yeast flakes
A few shakes of liquid smoke
1/2 tsp. salt
1/4 tsp. pepper

Directions:

For the beans: Our family eats beans so frequently that we are not bothered by gas issues. If you are, I would suggest soaking them overnight first, then draining them. For us, I put them in a medium pot and sort them for grit. Pour water to cover about one inch over the beans and bring to a boil. Let boil for five minutes, then drain and rinse thoroughly. Pour the beans back in the pot along with the box of broth and water to cover again. Cook on medium heat for two hours, stirring and adding water as necessary. Lower the heat to medium low, add the spices and cook for another hour. Your beans should be nice and tender, with water about a half an inch above the beans when done.

For the mashed potatoes: Peel the potatoes and cut into large chunks. Put in a large pot and cover with water. Bring to a boil, and let boil for fifteen minutes. Drain (you can save the potato water for soup, if you wish) and put the potatoes back in the pot off the burner. Add the margarine and mash with a potato masher. Add the milk, and more if necessary, to get a creamy mixture. Add the spices and mash again until there are no chunks. No extra margarine is added at the table, just a few shakes of salt and pepper. My oldest blessing shuns the gravy and just adds white vinegar - yuck!

For the gravy: Heat the margarine over medium heat in a small pot. When melted, add the flour and whisk. Slowly add the broth while whisking. Add the rest of the ingredients and continue to whisk over medium high heat. When it begins to boil, turn down heat to low and whisk for one more minute. This will thicken up even more the next day.

Add whatever vegetable or salad you like and enjoy this simple, budget-friendly meal that feeds a large family with enough for leftovers. Feeds five hungry vegans for a couple of days.